Getting Started
Where do I register / log in?
Go to app.catma.de – we suggest you bookmark that address, alternatively you can always find your way there by going to catma.de (this site) and clicking on the button to “Work with CATMA”, or “Login” at the top right.
Do I need to download CATMA?
No, you don’t, as CATMA is a web application. You just need a stable internet connection.
Which operating systems and browsers can I use?
All common browsers (Chrome, Firefox, Safari, Edge etc.) can be used on MacOS, Windows or Linux. Note, however, that annotating texts with touch devices is not yet supported.
Is CATMA really free?
Yes! As a research project, the development of CATMA is funded – currently by the Stiftung Innovation in der Hochschullehre (StIL, Foundation for Innovation in University Teaching) as part of the research project forTEXT).
What if something goes wrong and I need help?
That is part of our mission. Do not hesitate to Contact us and we will get back to you as soon as possible.
Login / Password Reset
How do I know if I can log in with my Google account?
Please visit this page for more information.
If I use my Google account to log in, will Google have access to my data?
No. We only use Google as an authentication service. Your text and annotation data will remain private (as long as you don’t share them with other CATMA users). Check our Privacy Policy and Terms of Use for more details on these topics.
How do I reset my password?
Please click here to reset your password.
Common Problems
Why can’t I see my annotations anymore?
You probably haven’t activated the eye-icon of the relevant tagset(s) in the Annotate module. When you open a document in the Annotate module, your annotations may not be visible by default, depending on which tagset was automatically set to be visible (see this manual entry to learn more about automatic tagset visibility).
Steps to make the annotations visible:
1) Log in and open the relevant project.
2) Go to the Annotate module. You will see a gray drawer on the left with a list of all Documents & Annotations of your project.
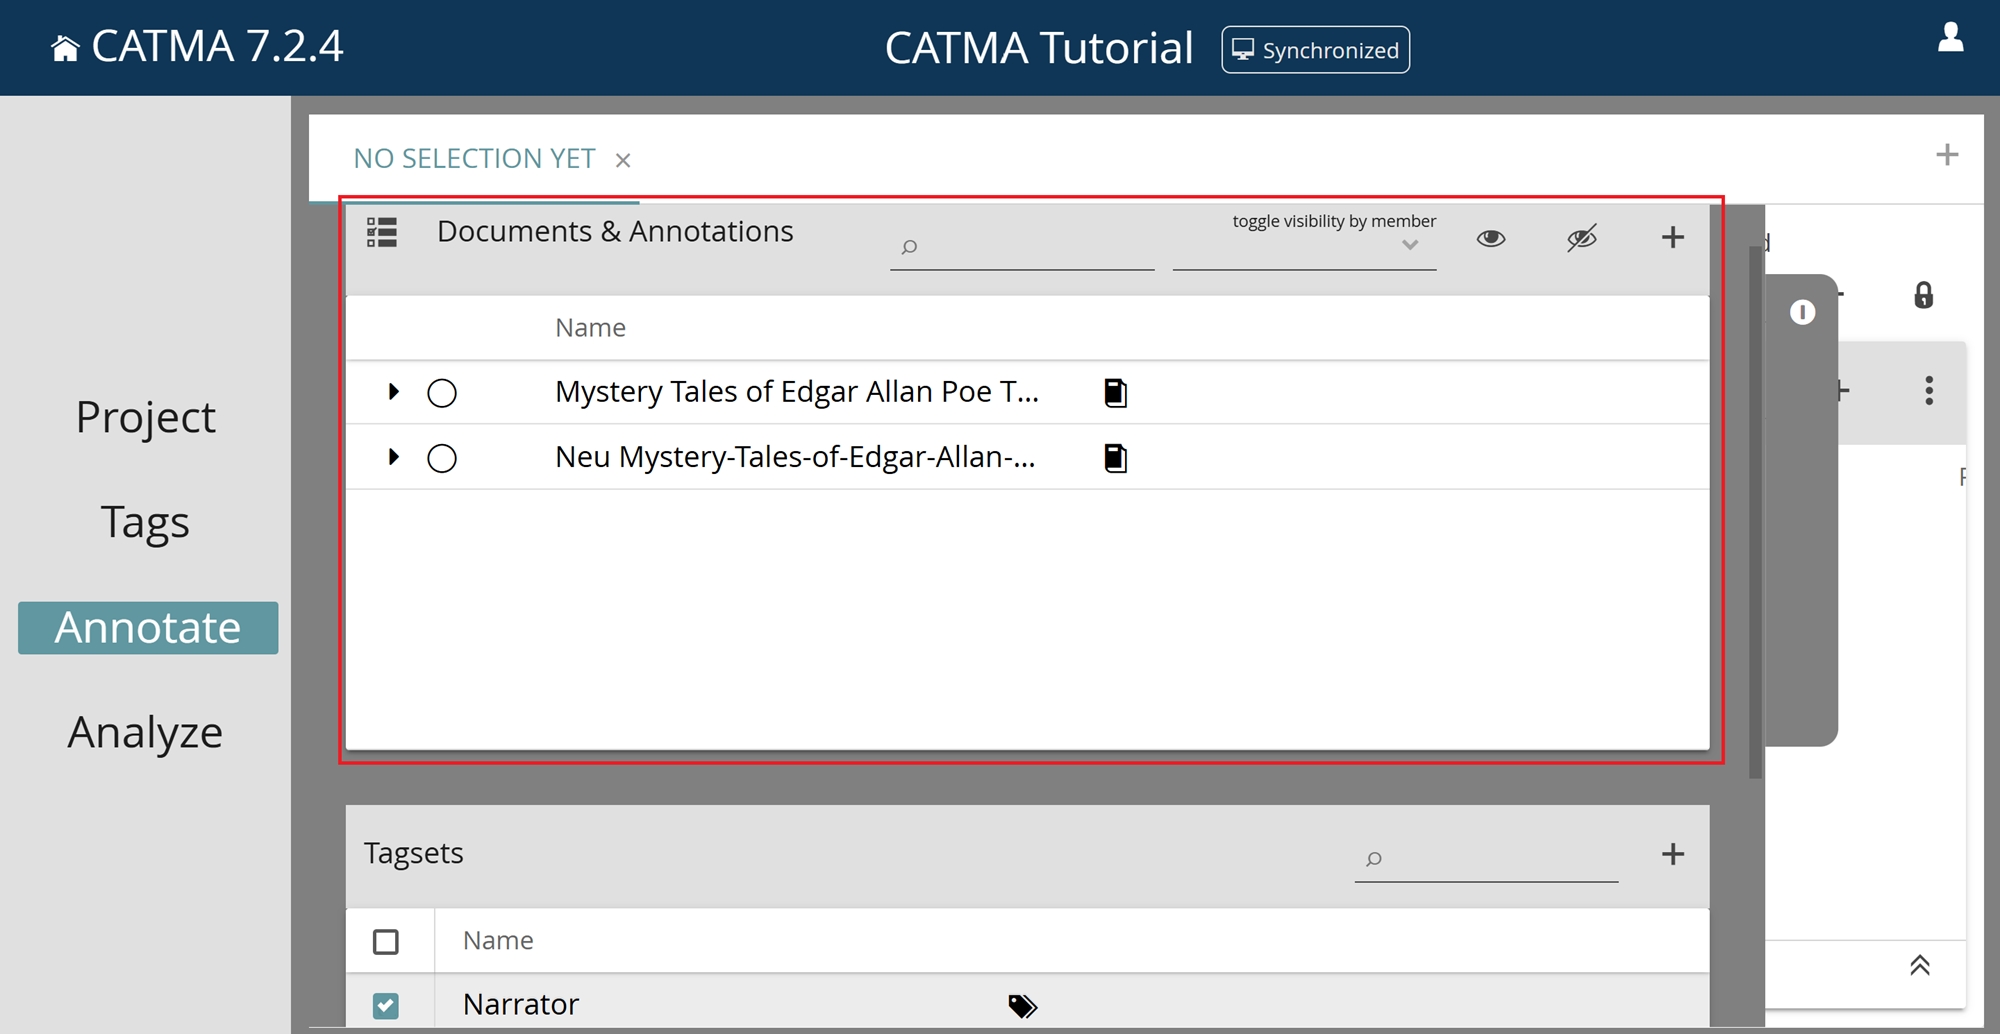
3) Click the arrow next to the desired document to reveal the associated Annotation Collections. Note the eye-icon next to each collection – this controls the visibility of the annotations within the corresponding collection and is set to visible by default.
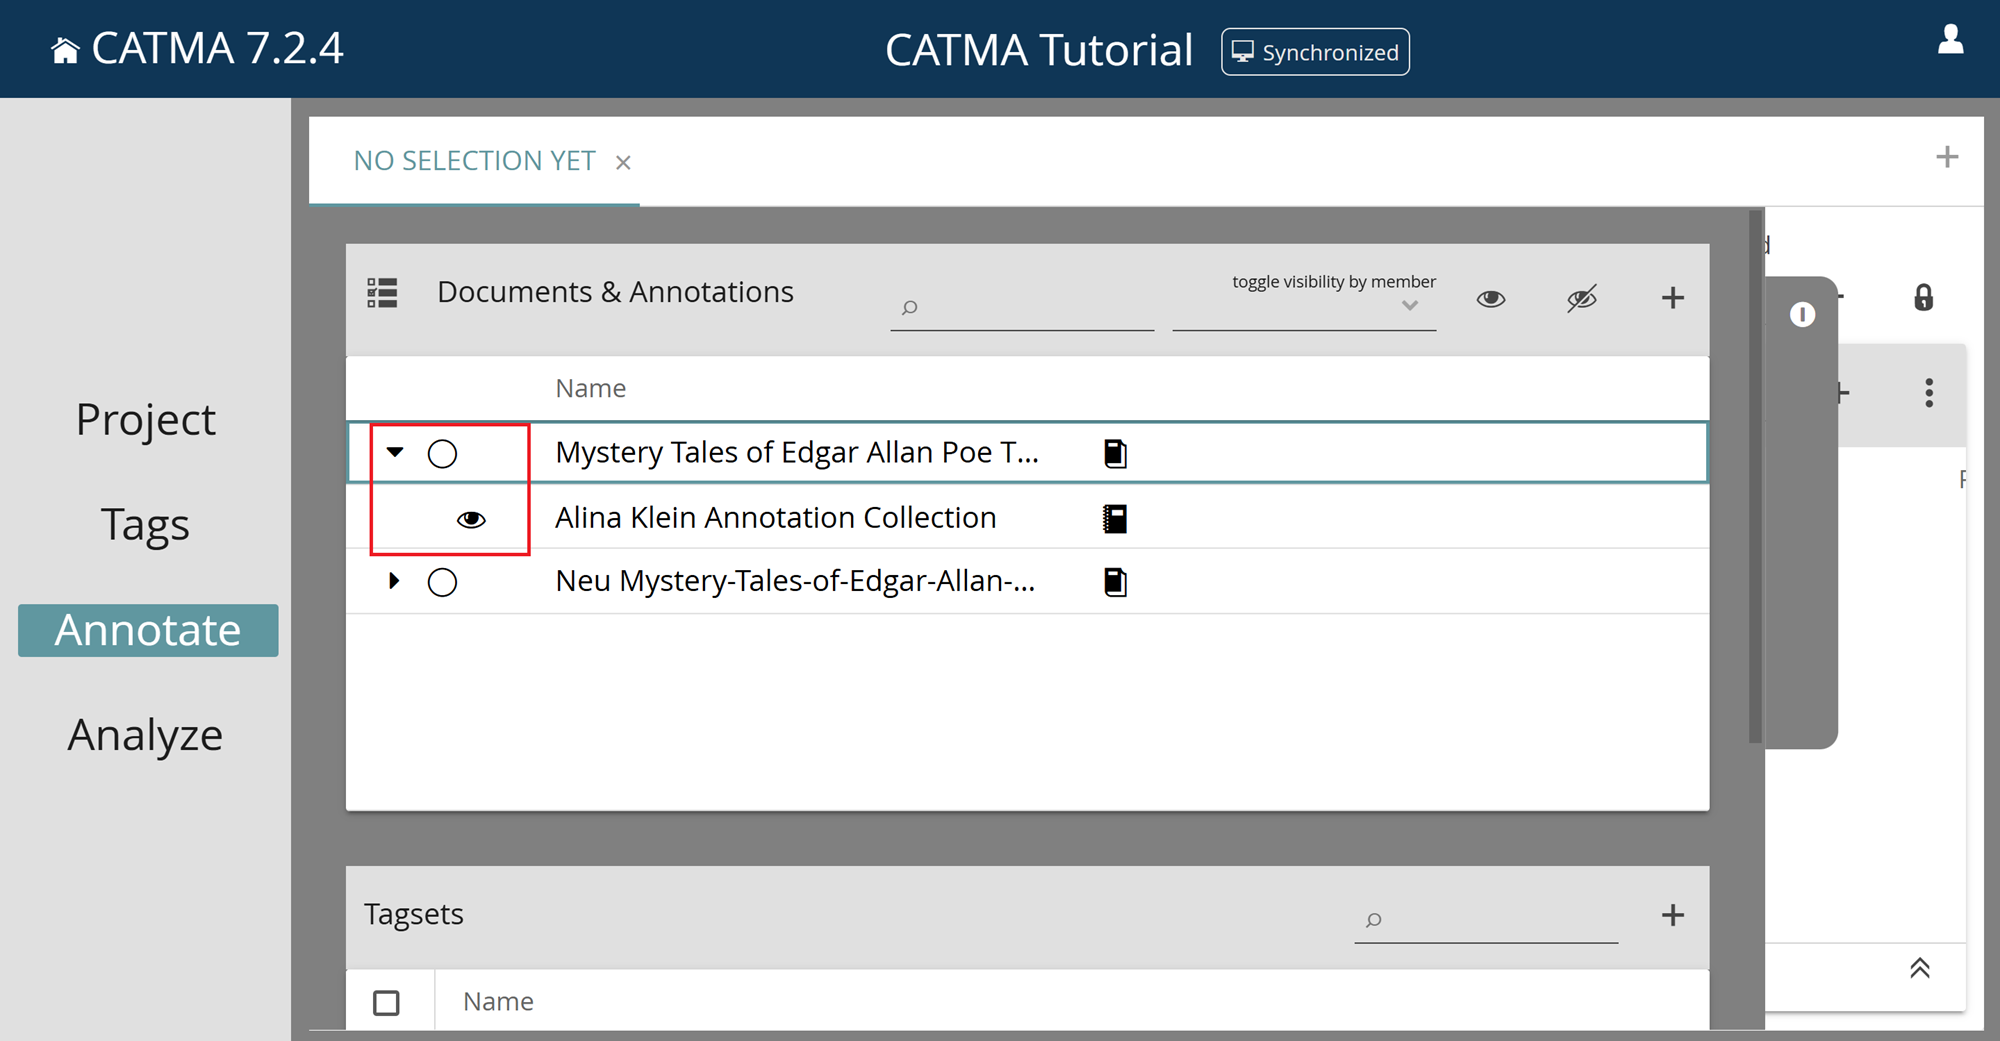
4) Select the document by clicking on the circle next to the name.
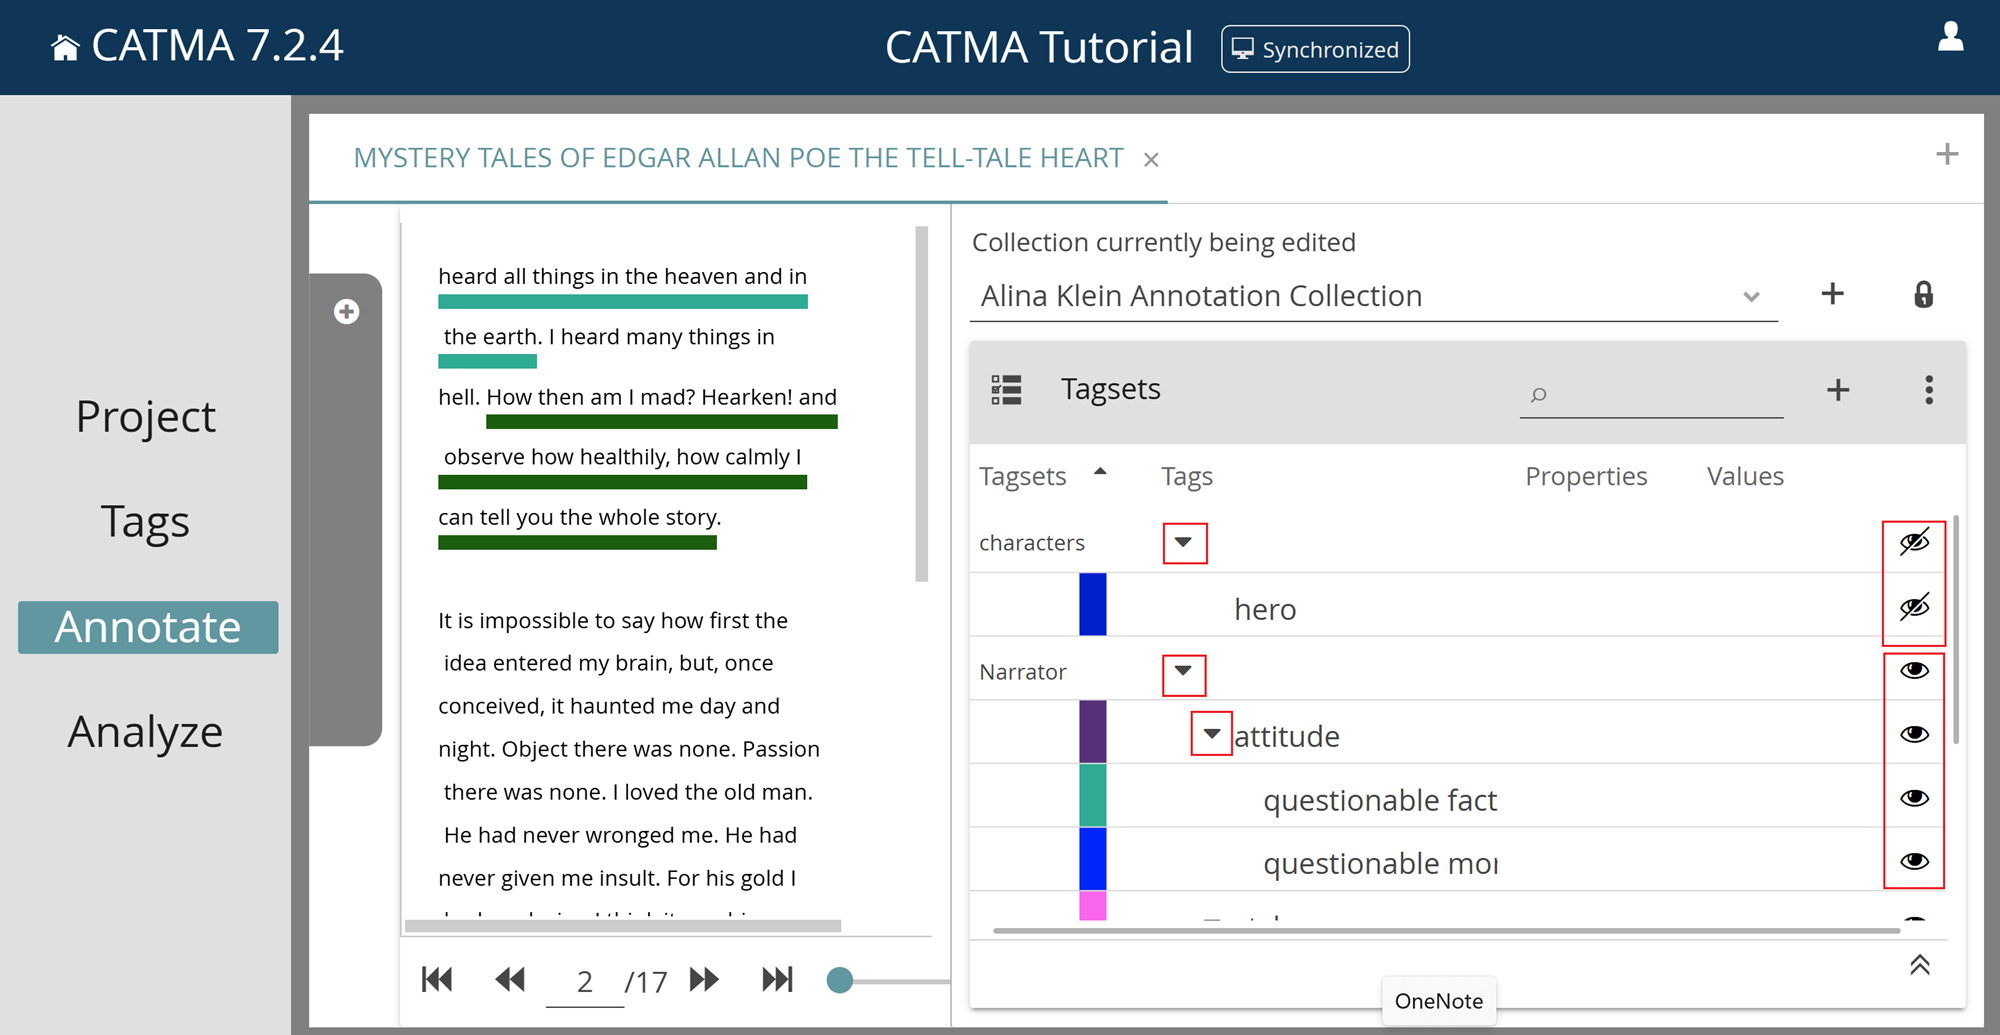
5) The gray drawer will close automatically and your text will be displayed on the left, with Tagsets on the right. Note the eye-icons next to the Tagset names – these control the visibility of the associated annotations and could be set to not visible (crossed out eye).
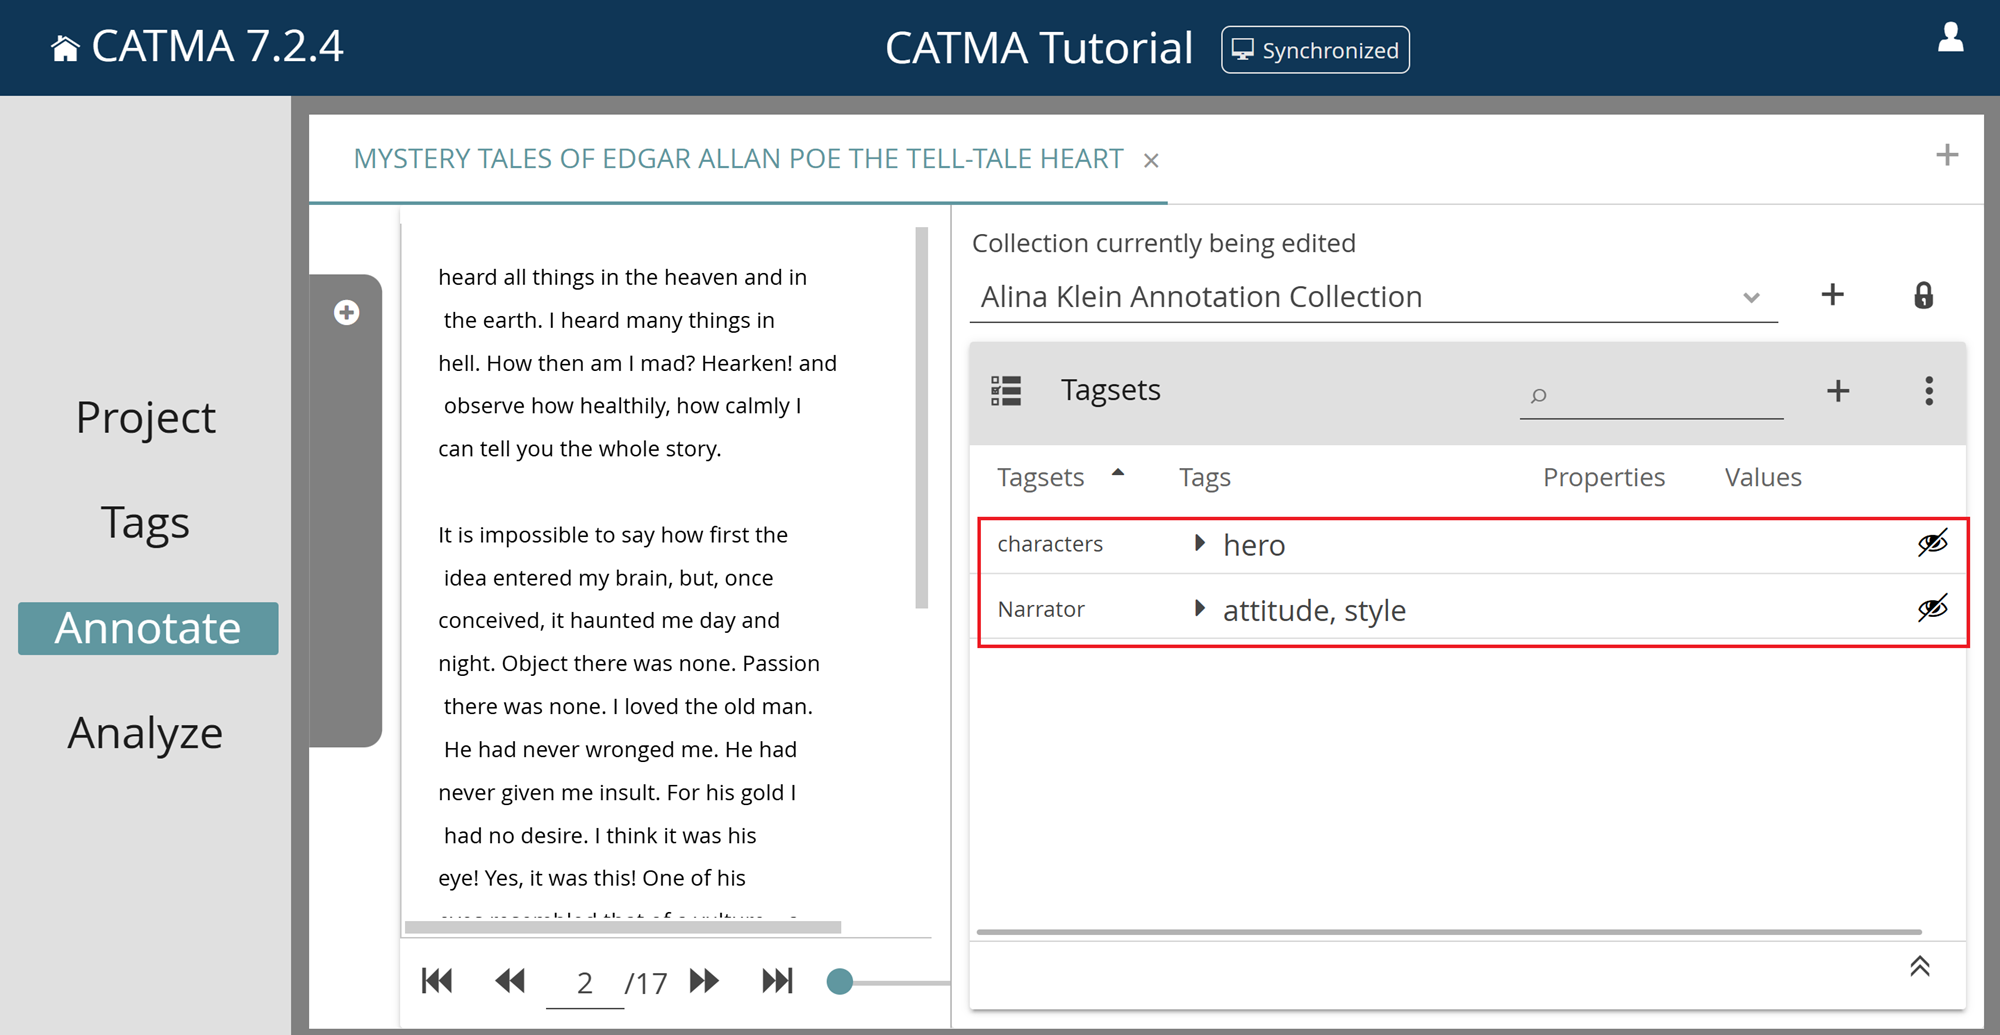
6) Click on a crossed out eye-icon to make all annotations for that Tagset visible.
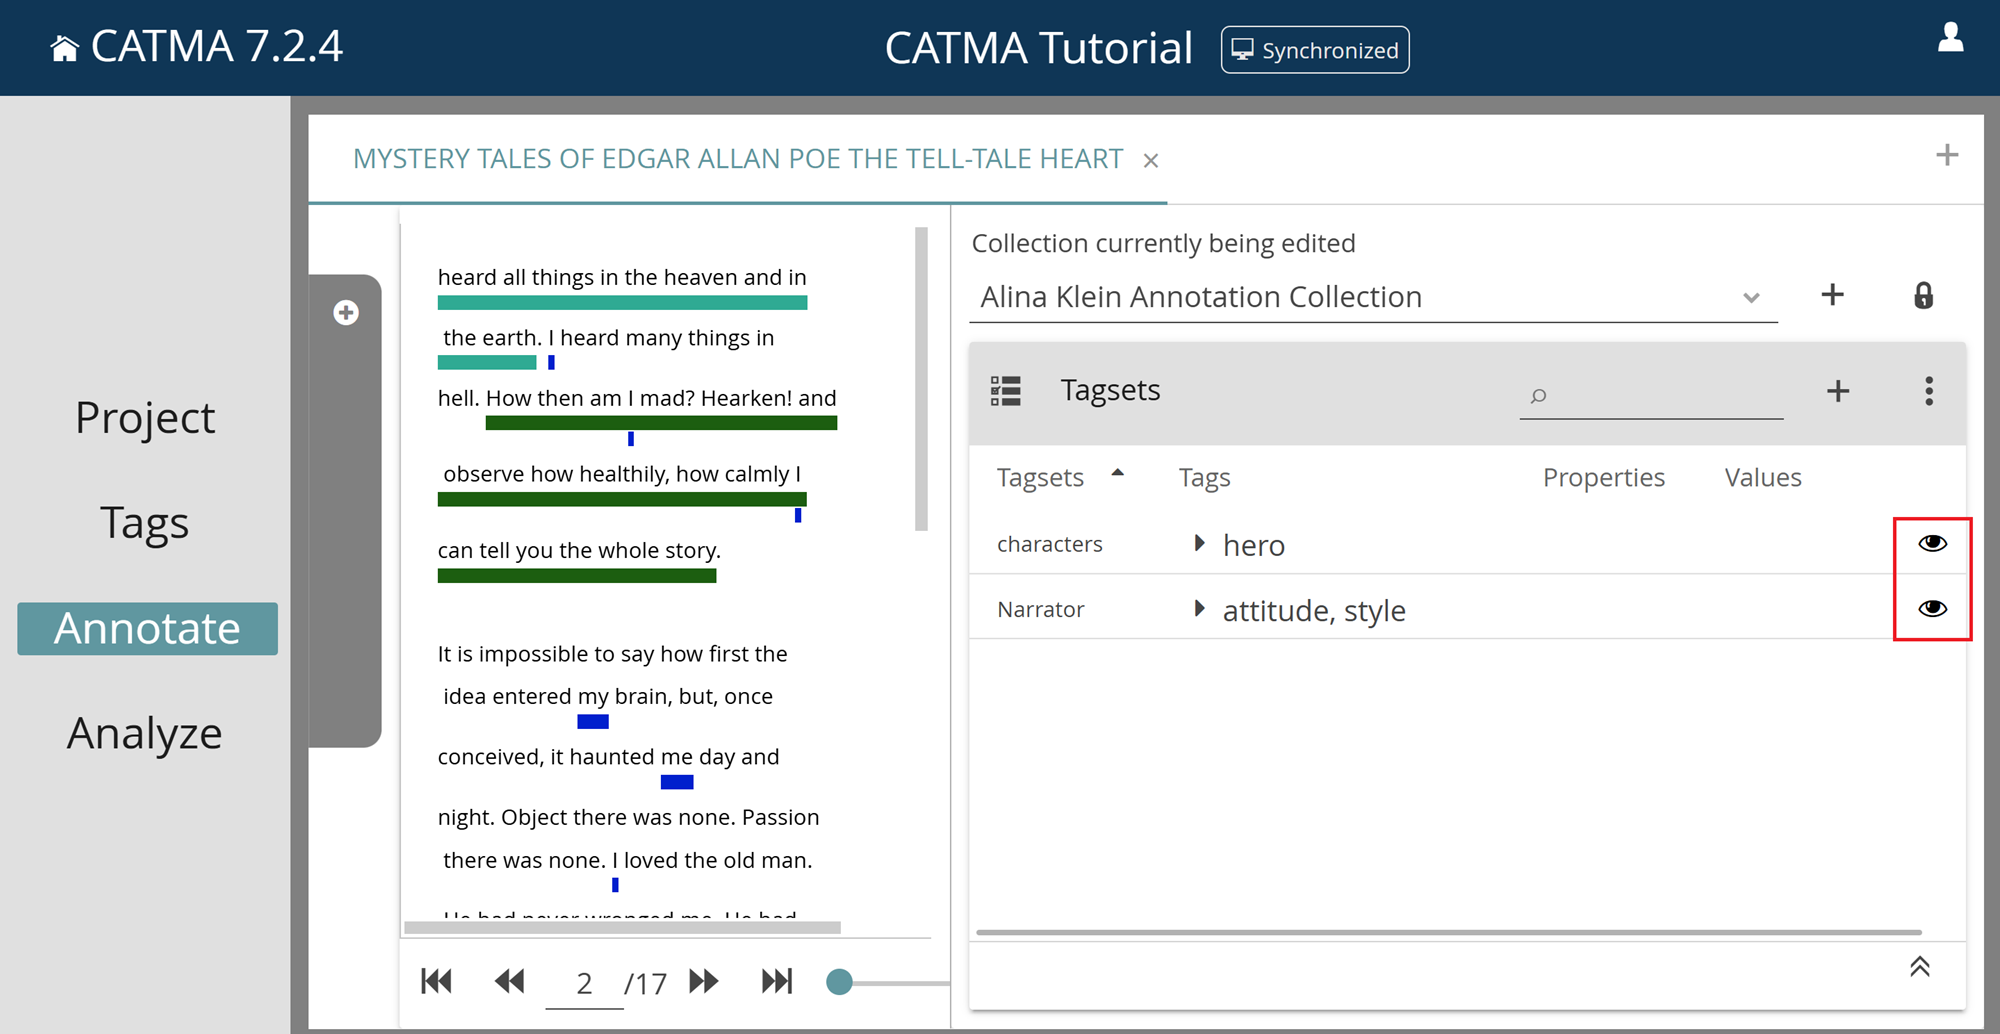
7) You can also control visibility at the individual tag level. Click the arrow in the Tags column to expand the Tagset and view the contained tags. Each tag has its own eye-icon.
Why am I not able to see or edit any resources in a shared project?
The project Owner has not yet assigned any rights to you for the resources, or one or both of you still need to use the Synchronization function. See the manual entries for roles and responsibility and synchronization, as well as the next question.
Why can’t I or my team members see any changes to the project?
If your team members are unable to see your project changes, either you, or they, or both of you probably forgot to use the Synchronization function.
Note that, currently, CATMA does not automatically tell you when other people have made changes that you could synchronize.
When you are ready to synchronize, click the “SYNC” button in the top-right corner of the Project module.
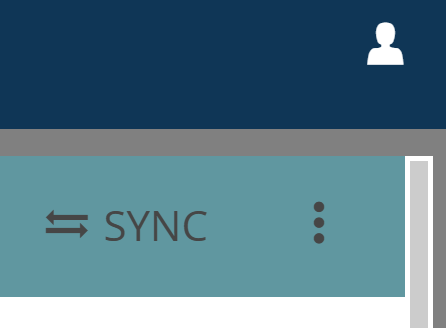
A notification will inform you whether synchronization succeeded or failed. If you are experiencing a problem while synchronizing, please Contact the support team. The other team members should now synchronize as well, after which they should be able to see your changes.
To learn more about synchronization, please see this manual entry.
Synchronization failed - what should I do?
This question is answered below.
Your Data
Where do you save my uploaded data?
Our servers are located in the data center of the Technical University of Darmstadt, Germany. We also utilize services offered by public cloud providers to store off-site backups. All data is therefore located in Germany (or in the case of backups, another member state of the European Union) and is subject to stringent security and access control policies. CATMA data and Privacy Policy fall under European jurisdiction.
What about copyright?
Please see our Terms of Use (§§ 2 and 3).
Can I upload sensitive data? Is my data encrypted at rest?
Generally speaking, you should not upload sensitive data to CATMA (for example interviews, surveys, medical information or anything containing personally identifiable information (PII)). If you choose to do so, it is your responsibility to pre-process the data to anonymize it and to remove any PII before upload. Note however, that depending on the exact type of information, this may not be enough to adhere to applicable law.
We do not encrypt your data on our own servers when it is stored on disk! Our off-site backups are encrypted, and only we hold the encryption keys.
Please also see our Privacy Policy and Terms of Use (§4).
What happens to my data if your servers crash?
Everything is automatically backed up at least once per day and backups are stored in multiple locations. Therefore it’s unlikely that you would ever lose more than a day of work, even in a worst case scenario. However, it’s never a bad idea to create your own backups (there are a number of export options, as well as the Git Access).
Is it possible to save local copies of my data?
Yes. You can export text and annotation data to your own computer (see export options below), or you can use Git to clone your projects/repositories (see Git Access). For advanced use cases there is also the JSON API.
Exports
Which export formats are supported?
- .txt
- .xml (TEI – see here for detailed information on CATMA’s TEI-XML export format)
- .csv
How can I export resources from the Project module?
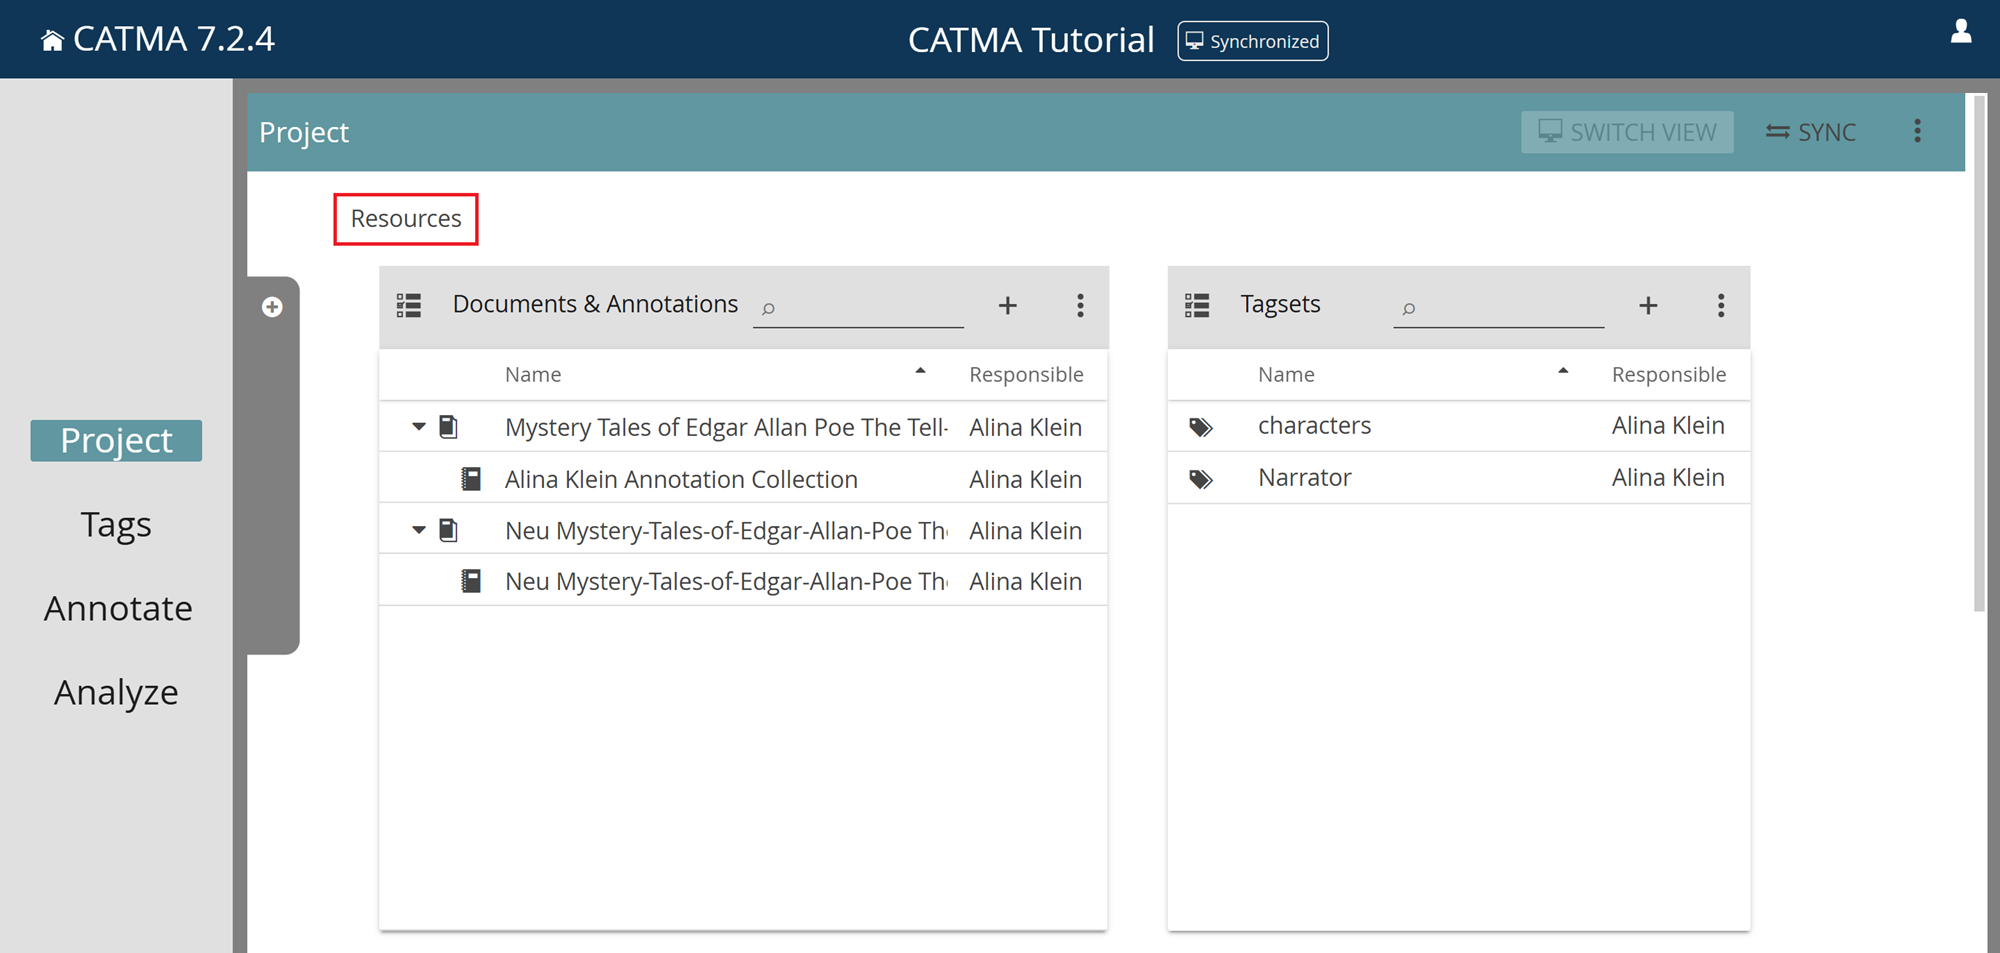
First, open the relevent project. You will automatically be taken to the Project module with its Resources section. There, you can export from the two panels Documents & Annotations and Tagsets.
Exporting Documents & Annotations
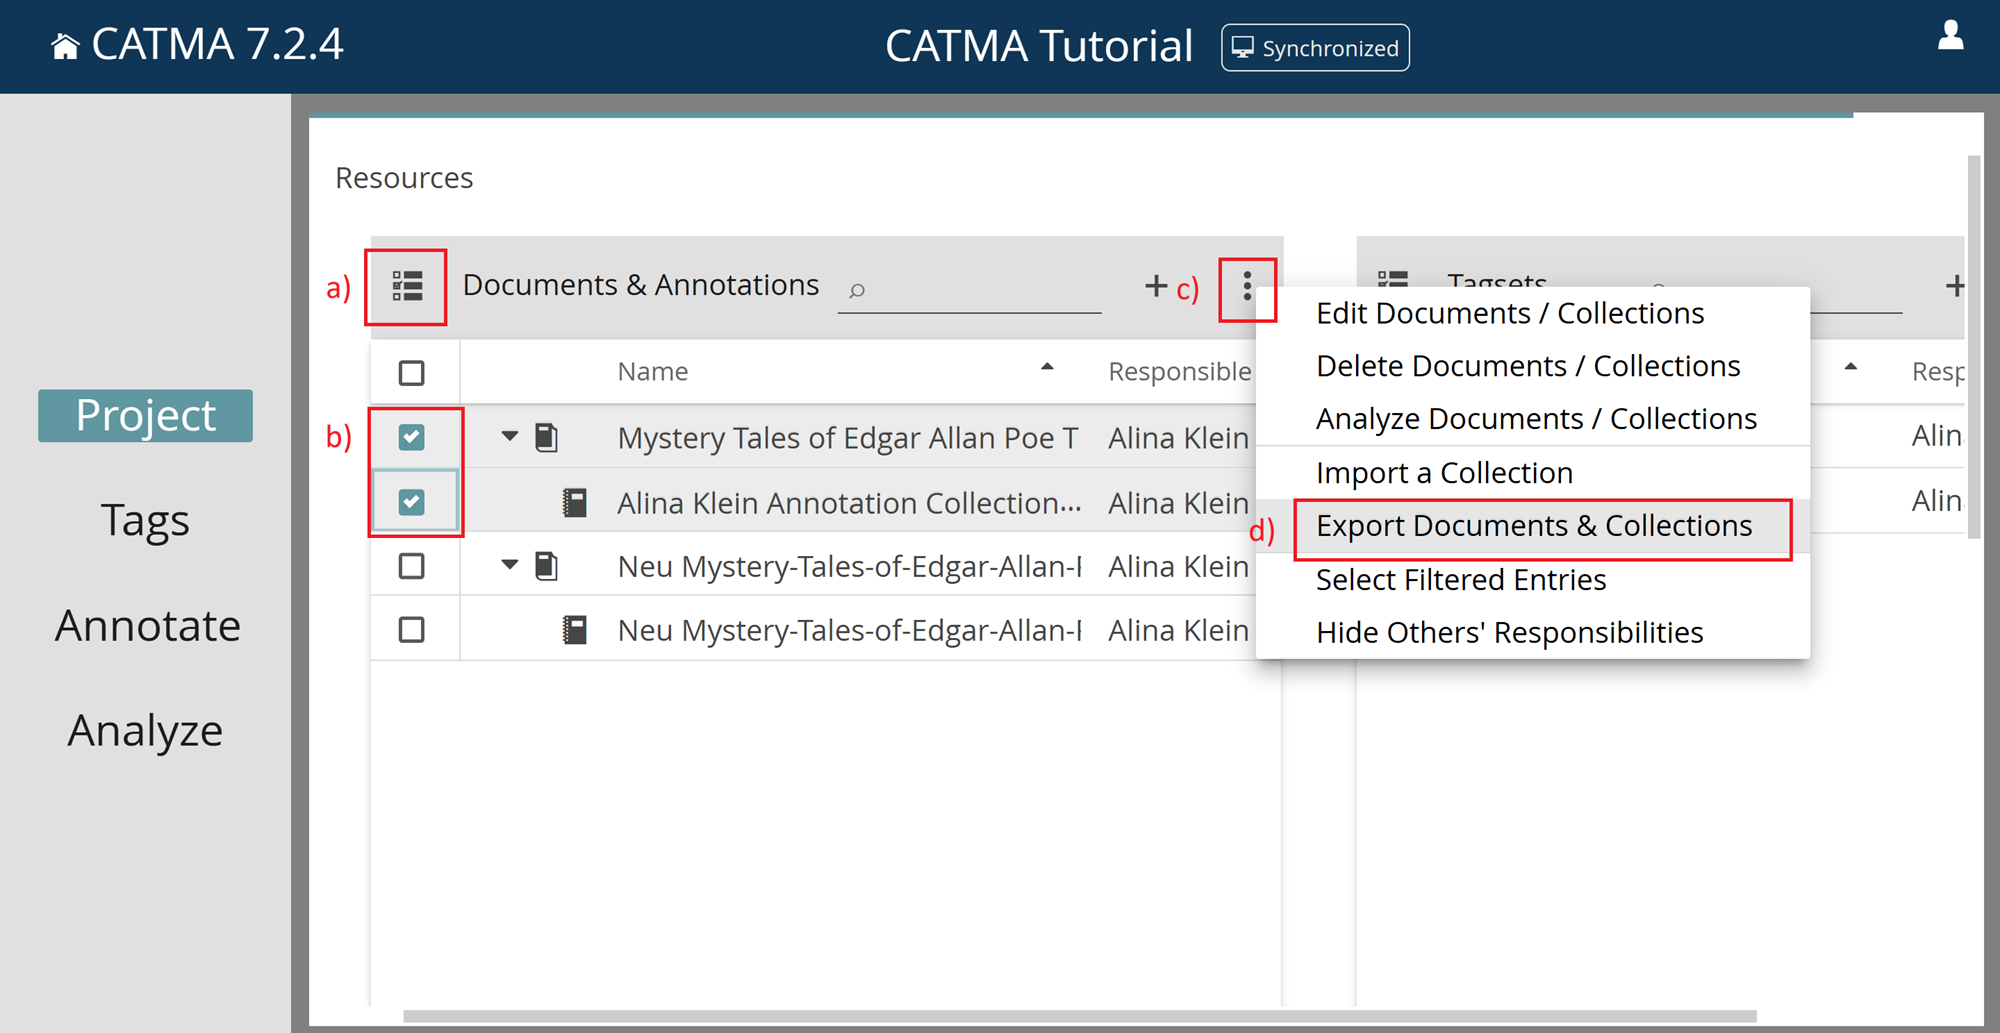
To select one or more documents and annotation collections, switch on the checkboxes using the list icon in the top left corner of the panel (a – see screenshot below).
After you have selected your desired documents and annotation collections (b), you will be presented with the following option via the three-dot menu (c): Export Documents & Collections (d). Note that, depending on the number and size of the selected resources, it may take some time for the download to start.
How is the export structured?
The export files are of the .tar.gz file type, a Unix / Linux ZIP format. After extracting these files, you will find one or more folders that are named according to the document(s), each containing the document itself (of the .txt file type) and a folder annotationcollections that contains a TEI-XML file per annotation collection (if one or more were selected).
The TEI-XML files contain the following XML elements/attributes (see here for detailed information on CATMA’s TEI-XML export format):
<teiHeader>: Contains almost exactly the same information as the XML-file that you get when you
             export a tagset (see Exporting Tagsets below)

<text>: Contains the <ptr>, <seg> and <fs>-elements:
   <ptr>-elements are always references to a section of the text. The target attribute contains
         the document ID and the character offsets (start,end) of the section of text being
         referenced.
   <seg>-elements contain a <ptr>-element, and together with a referenced <fs>-element they
         denote an actual annotation. The ana attribute points to the xml:id of an <fs>-
         element.
   <fs>-elements reference a particular tag (found in the <teiHeader>) via the type attribute,
         and they contain metadata and property values of the annotation as <f>-elements.

In summary, a single annotation is a combination of <seg>, <ptr> and <fs>-elements.
Note that even the non-annotated sections of the text are referenced by <ptr>-elements, but that
these are not enclosed by <seg>-elements.
Exporting Tagsets
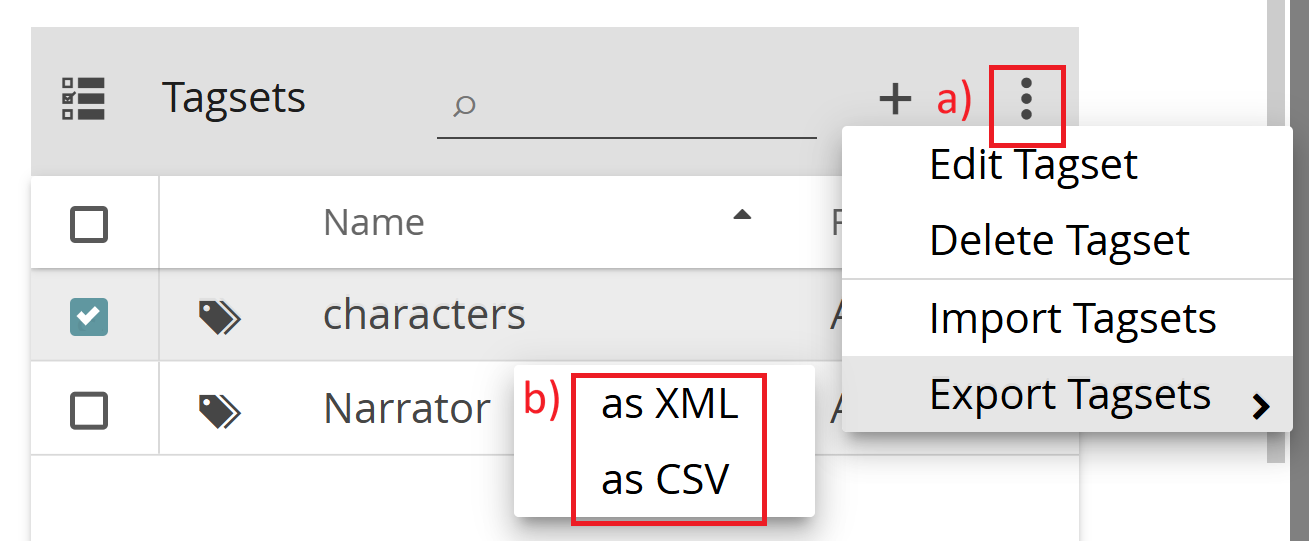
Tagsets are exported in a similar manner as documents and annotations. Select the desired tagset(s) and choose one of the following from the three-dot menu (a):
- Export Tagsets > as XML (b)
- Export Tagsets > as CSV (b)
What information is included in the exported XML files?
Each XML file contains a TEI-encoded tagset. The most important human-readable information is contained in the following XML-elements/properties:
<teiHeader>
    <fileDesc>
        <titleStmt>
            ˂title˃: Project title
            ˂author˃: Your public name, i.e. the one who downloaded this file
        </titleStmt>
        <publicationStmt>
            ˂publisher˃: Your public name, i.e. the one who downloaded this file
        </publicationStmt>
        ...
    </fileDesc>
    <encodingDesc>
        ˂fsdDecl n=”[name] [hash]”˃: Name of the tagset
            ˂fsDecl˃: A tag
                ˂fsDescr˃: Name of the tag
                ˂fDecl˃: Metadata elements including the display color of the tag (name="catma_displaycolor"),
         the username of the tag author (i.e. the one who created this tag -
         name="catma_markupauthor"), as well as user-defined properties and their proposed
         values (name="[property name]")

            </fsDecl>

        </fsdDecl>

    </encodingDesc>

</teiHeader>
What information (i.e. column names) is included in the exported CSV files?
The CSV file contains the following column names:
a. Tagset
b. Tagset ID
c. Tag
d. Tag ID
e. Tag Path
f. Tag Parent ID
g. Tag Color
h. Tag Author
i. Project Name
j. Project ID
k. Tag Properties & Values & Property ID
How can I export my query results from the Analyze module?
Select one or more documents and annotation collections (from the gray drawer on the left) and execute a query. In this module, you can export from the results panel or from the KeyWord in Context table.
Exporting from the results panel
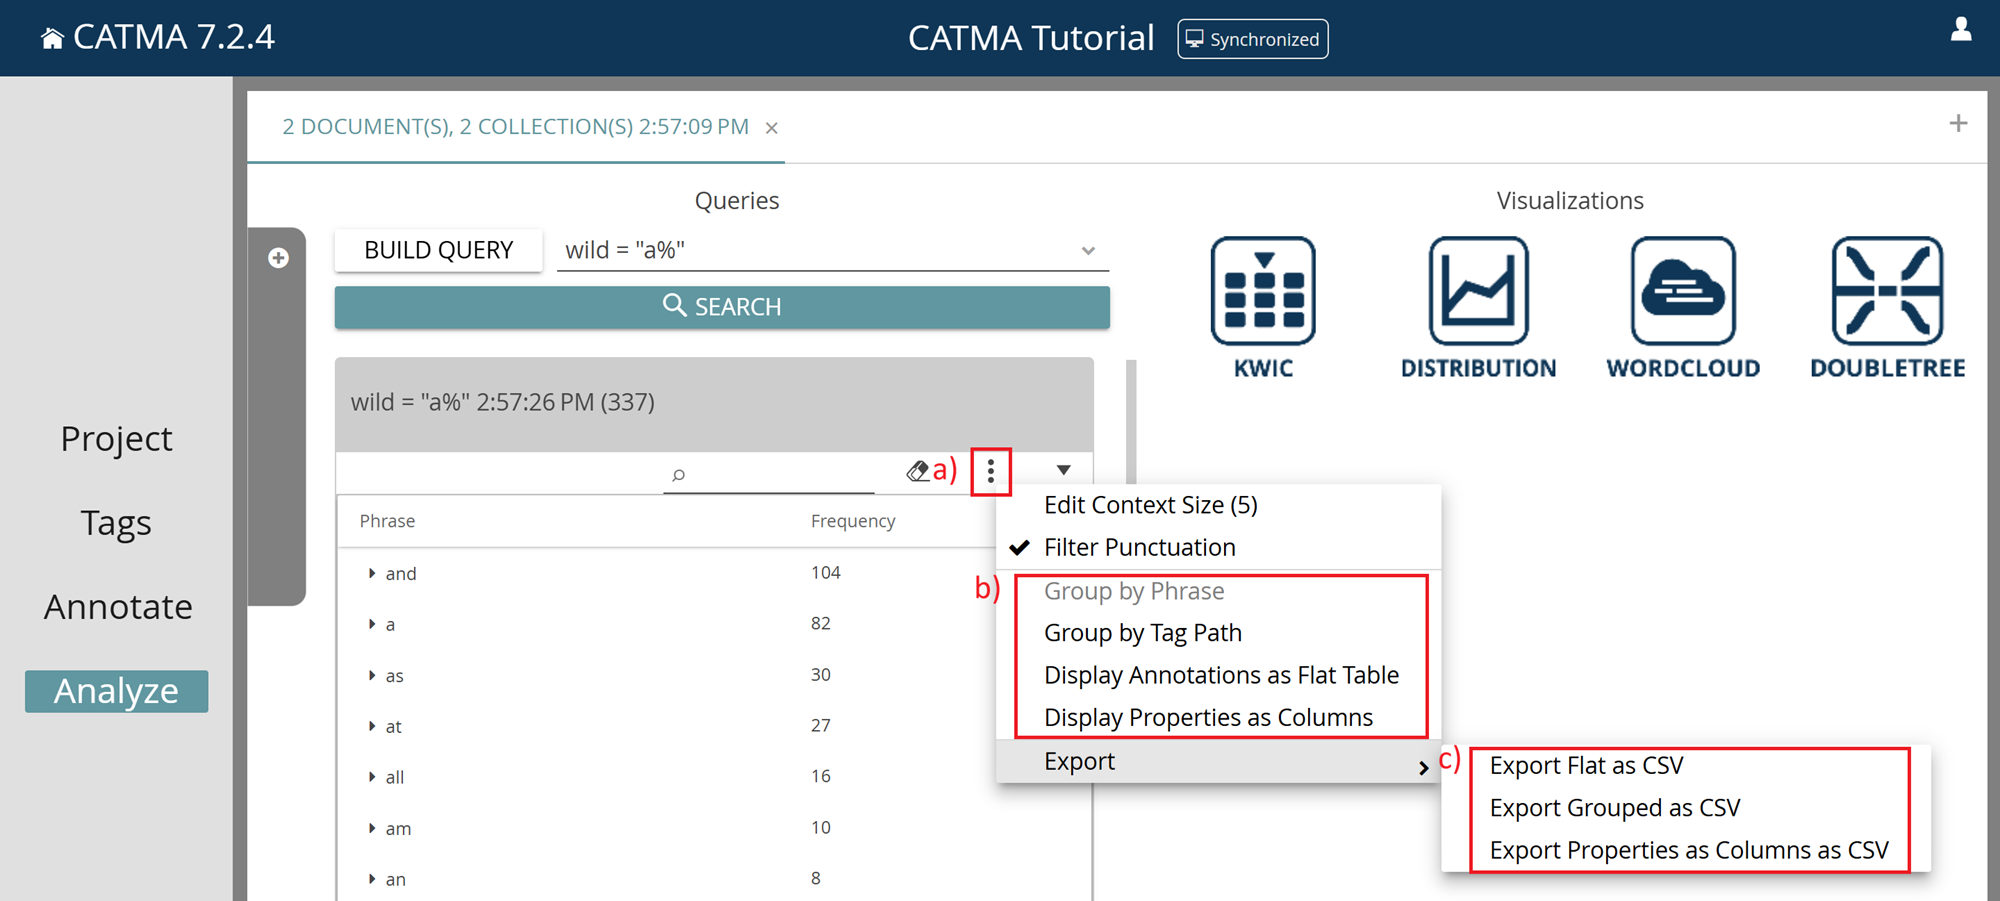
First, click on the three-dot menu in the results panel (a). There you can choose between the following display options (b):
- Group by Phrase
- Group by Tag Path
- Display Annotations as Flat Table
- Display Properties as Columns
Next, click on the three-dot menu again and choose one of the export options (c):
- Export > Export Flat as CSV
- Export > Export Grouped as CSV
- Export > Export Properties as Columns as CSV
Note that, depending on the number and size of documents, as well as the number of annotations, it may take some time for the download to start.
What information (i.e. column names) is included in the exported CSV files?
The exact output depends on the export option chosen (flat, properties as columns, or grouped). For the grouped export option, the output additionally depends on the selected display option (whether or not Group by Tag Path is selected).
Option: Export Flat as CSV
The CSV file contains the following column names:
a. Query ID (the actual query, and the date and time that it ran)
b. Document ID
c. Document Name
d. Document Length (in characters)
e. Keyword (word, phrase, or annotated text segment)
f. KeyWord in Context (keyword enclosed in triple asterisks)
g. Start Offset (character based)
h. End Offset (character based)
i. Collection ID
j. Collection Name
k. Tag
l. Tag Version
m. Tag Color
n. Annotation ID
o. Property ID
p. Property Name
q. Property Value
r. Comment ID
s. Comment/Reply
t. Comment Author
u. Reply Count
v. Reply ID
Columns I-N are only populated when exporting the results of a tag query. Similarly, columns I-Q are only populated for property queries, and columns R-V are only populated for comment queries.
Also note that, for property queries, individual annotations will be represented by multiple rows, as each property of an annotation requires its own row with this format. This causes a lot of duplication of data in columns A-N, which can be avoided by choosing the next export option: Properties as Columns. For comment queries, comments with one or more replies will result in multiple rows too.
Option: Export Properties as Columns as CSV
The CSV file resulting from this export option is almost the same as for the Flat option above. The difference is that columns O, P, and Q are replaced by individual columns for each property. In other words, the properties are also flattened, so that each row represents a single annotation.
Option: Export Grouped as CSV
The CSV file contains the following column names:
a. Group (unique words, phrases, annotated text segments or tags)
b. Total (sum of occurrences of the item in column A across all selected documents / annotation collections)
c. [Document title and ID] (no. of occurrences in this document)
d. [Collection name and ID] (no. of occurrences in this collection)
Column D is only included when exporting the results of a tag or property query. Columns C and D will be repeated according to the number of selected documents / annotation collections.
Exporting from the KeyWord in Context table
Once you have some query results, switch to the KWIC view on the right (under Visualizations).
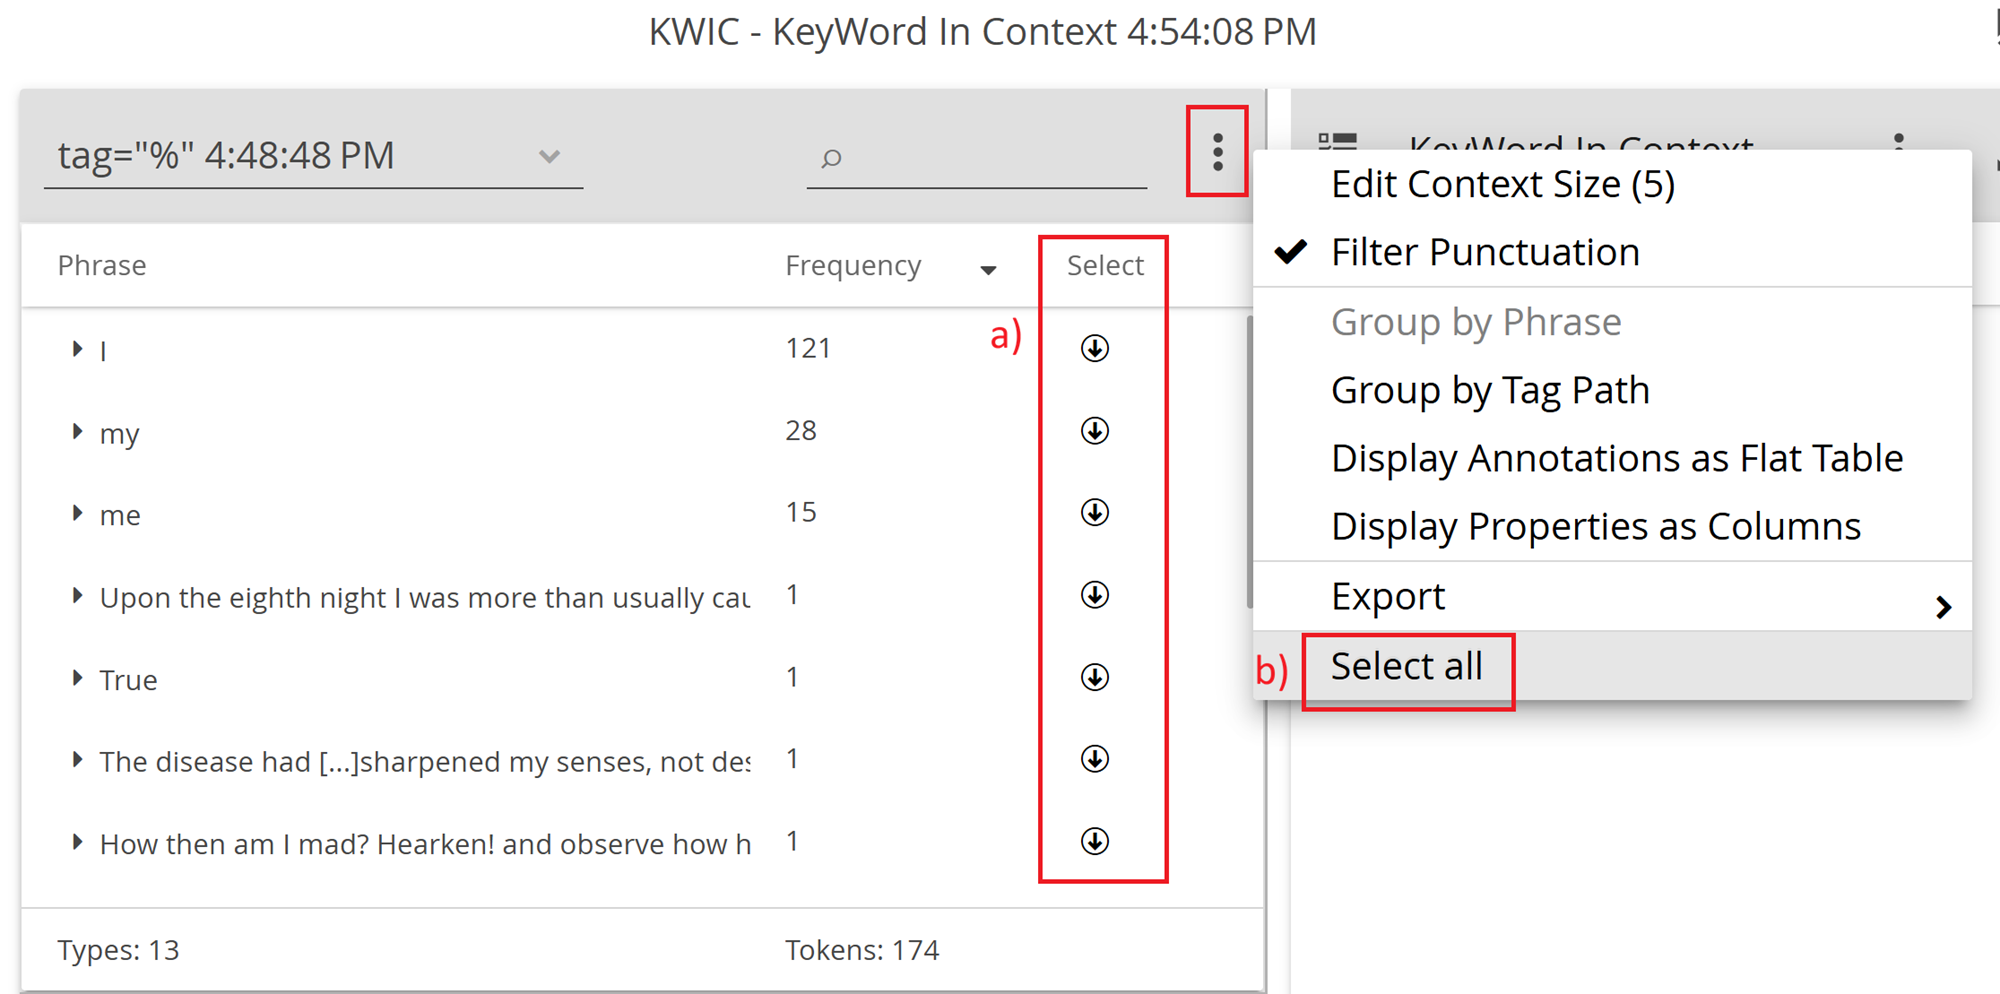
In the results panel, a new column named Select will appear.
Select each result you wish to be displayed in the KWIC table, by clicking on the down-arrow icons (a). You can also select all results by choosing the option Select all (b) from the three-dot menu.
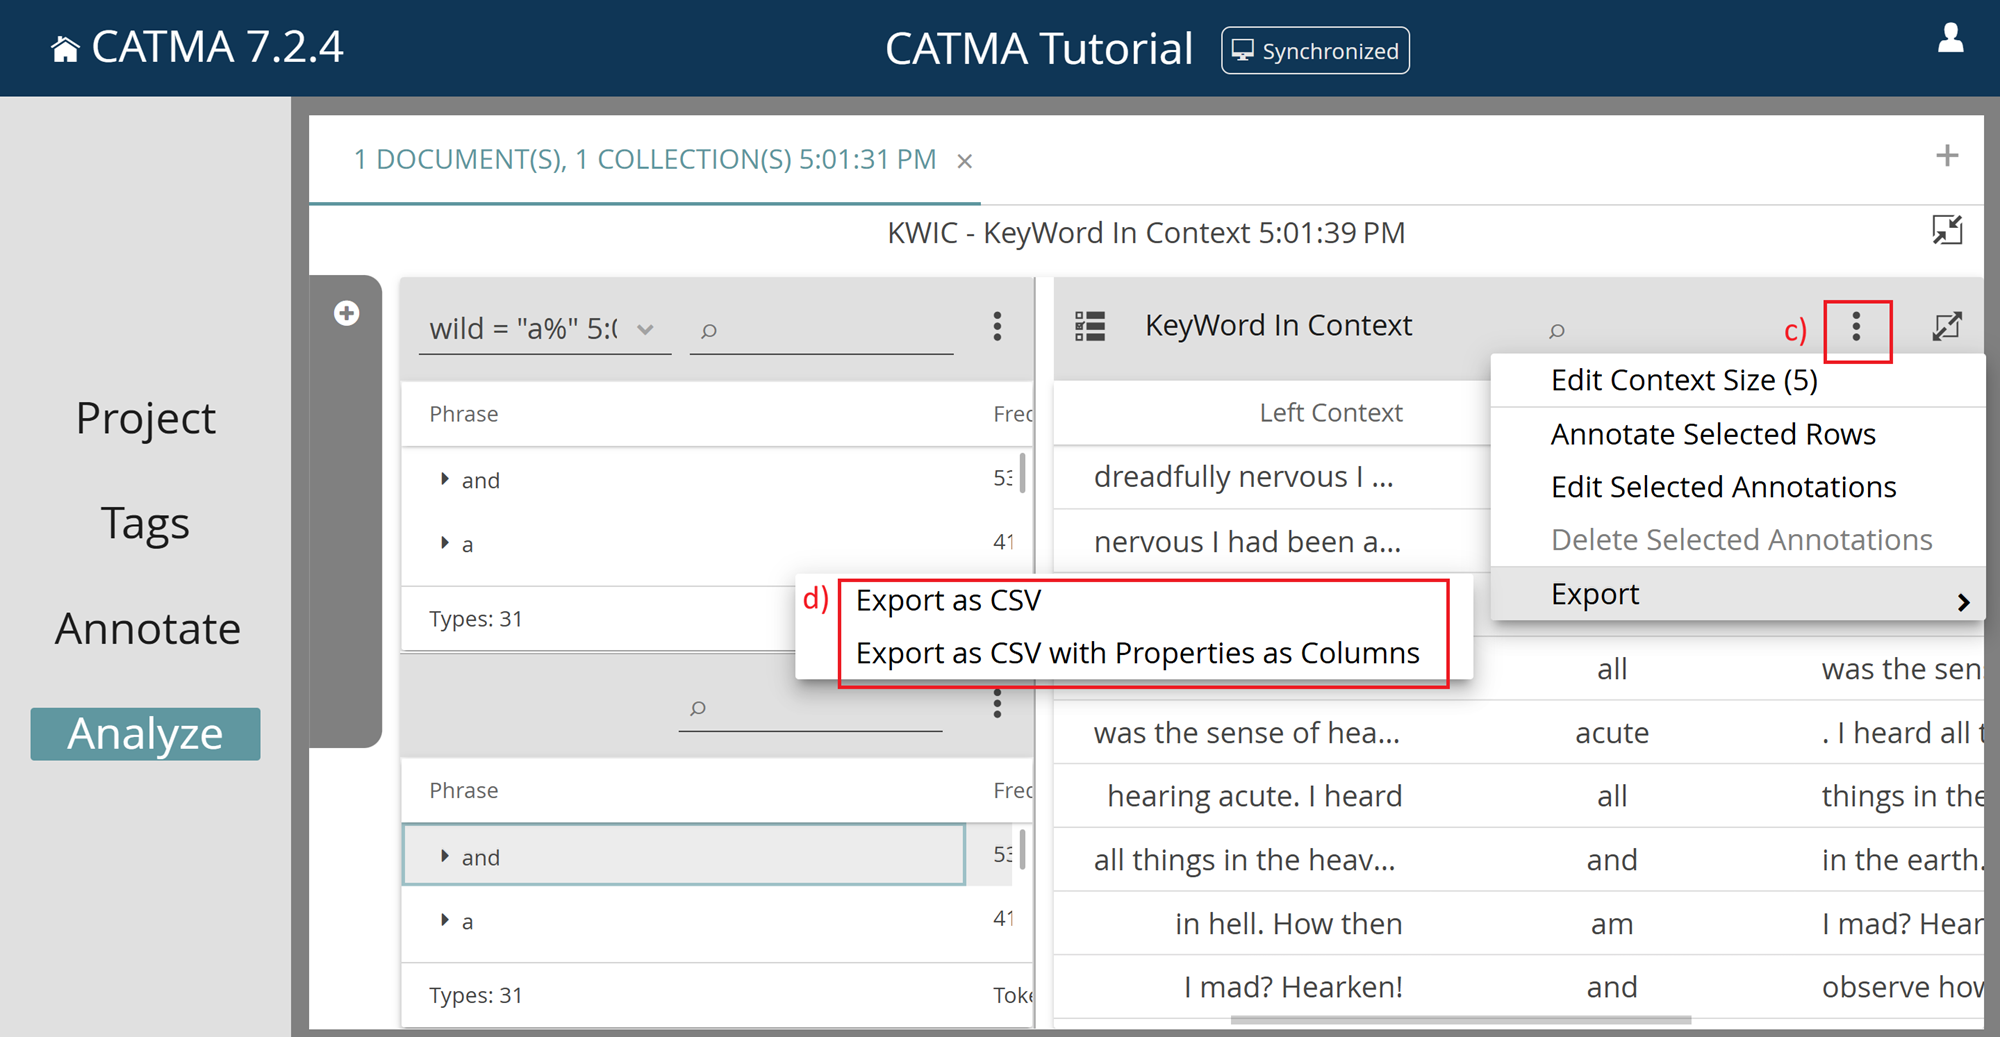
Next, from the three-dot menu of the KWIC table (c), choose one of the export options (d):
- Export > Export as CSV
- Export > Export as CSV with Properties as Columns
What information (i.e. column names) is included in the exported CSV files?
The CSV file has the same structure as the Flat or Properties as Columns export options when exporting from the results panel (see the start of this answer above).
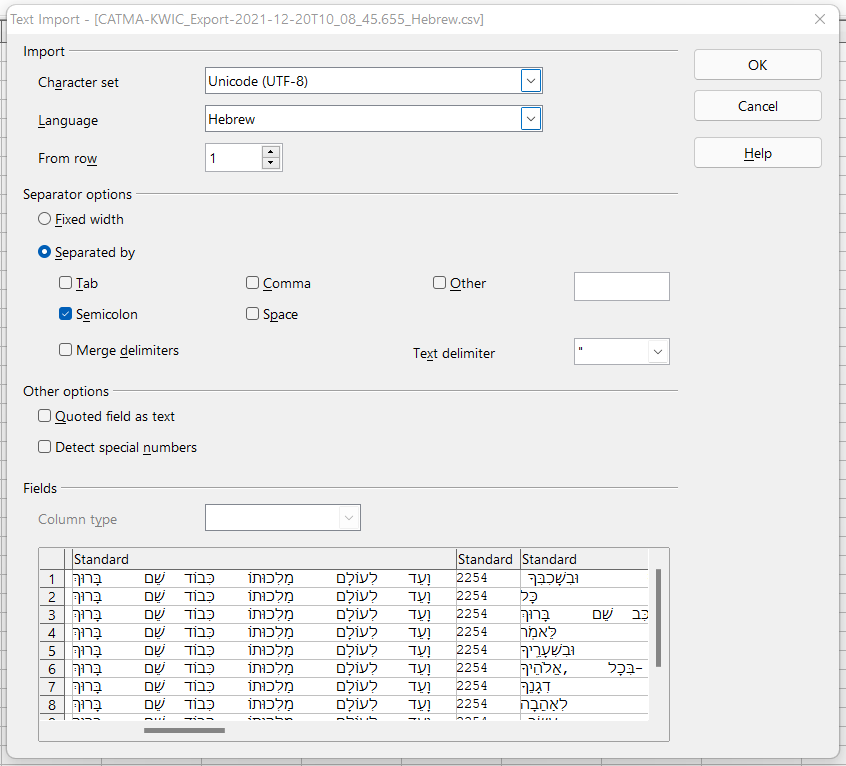
How do I open exported CSV files in other programs like Microsoft Excel and OpenOffice/LibreOffice? Why can’t I see non-Latin characters in exported CSV files?
If you are working with texts in languages that use the Latin alphabet, you can usually open CSV files exported from CATMA without any problems.
However, if you are working with texts in languages that use other characters, such as Greek or Hebrew, you may need to take additional steps before the file contents are displayed properly. In our experience, especially Microsoft Excel tends to automatically choose the Windows-1252 (Latin) character set, without first giving the user a choice.
Note that CATMA CSV exports use the UTF-8 Unicode encoding / character set, and the semicolon as a separator/delimiter.
Programs like OpenOffice and LibreOffice usually give you some options as soon as you open a CSV file, as shown below. Note the choice of character set and separator.
For Microsoft Excel, depending on the version, you may need to find the option to import a document, rather than simply opening it. You should then see a similar dialog, where you can make the appropriate choices. Note the selections under ‘File Origin’ and ‘Delimiter’ below.

Collaboration & Synchronization
How do I add members to my project? What are the roles and permissions that can be assigned?
You are given several options for adding members to your project:
- You can invite one or more new members to the project via email (the standard and probably easiest way)
- Navigate to the plus icon in the top-right corner of the Members tile and select Invite Someone to the Project by Email.

- You can invite them via an invitation code (recommended for larger groups in a live seminar setting – see the Typical Seminar Workflow tutorial for full details)
- Navigate to the three-dot menu in the top-right corner of the Members tile and select Invite Someone to the Project by a Shared Code

- You can add them directly by entering their usernames (recommended for individuals)
- Navigate to the three-dot menu in the top-right corner of the Members tile and select Add Someone Directly by Username

- You can first create a user group (covered in this manual entry) and then add it the project (recommended for larger groups)
- Navigate to the plus icon in the top-right corner of the Members tile and select Add a User Group.

All options for adding members are covered in detail in this manual entry.
Please visit Roles and Permissions for details on those.
When should I synchronize my project?
Whenever you make changes to your documents, tagsets, or annotation collections, you have the option to synchronize. This is especially important if you are working with others in the same project. To learn more about synchronization, please see this manual entry.
Synchronization failed - what should I do?
When attempting to synchronize, you may see an error like the following:

If you are experiencing a problem while synchronizing, please Contact the support team.
To learn more about synchronization, please see this manual entry.
Limits & Restrictions
Is the uploadable file size or the number of users that can work collaboratively limited?
Theoretically not – if a problem arises, Contact us and we will try to resolve it. Note however that CATMA is a tool that emulates traditional practices in the field of qualitative text studies (with a focus on literary studies), and thus has not been designed as a quantitative or statistical text mining environment for handling massive amounts of data.
Citation
How do I cite the CATMA tool and screenshots of annotations etc. in CATMA?
Please check the footer at the bottom of our website for the correct citation.

